Aurora Sisneros

Session 2: Assemble & Iron the Blocks

Aurora Sisneros
Duration:   8  mins

Description

Aurora talks about what a quarter inch foot is. She’ll show how to make a pile of your squares, and sew them over and over into bunting, how to clip them all apart and get them stacked for ironing. She will also show you the trick to ironing FAST and lastly, trim the extra off each block.

Share tips, start a discussion or ask other students a question. If you have a question for the instructor, please click here.

Make a comment:
characters remaining

No Responses to “Session 2: Assemble & Iron the Blocks”

No Comments

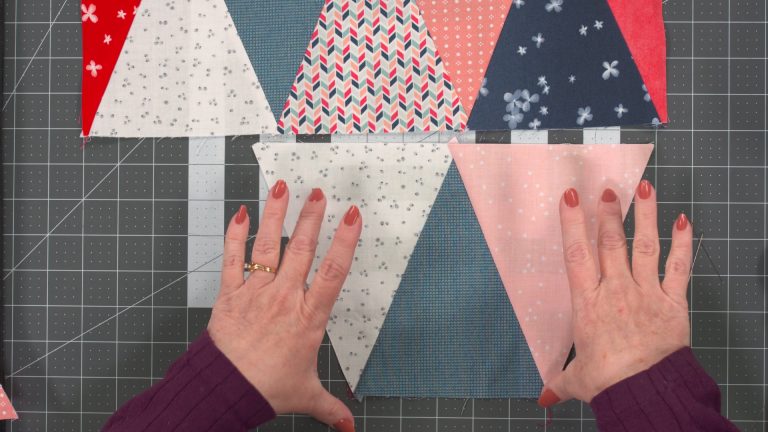
Now that we have all of our half square triangles cut out, it's time to assemble them. I have a stack here of my solid color, which I'm using as my offset for this particular quilt. Right here, I have a stack of multiple colors. Now, in the quilt example, you saw that I had three colors. So I'm gonna stick to that same game plan here.

Although we will talk in a little bit about the versatility. So, I have my three different colors here and I just have a handful of blocks. So I'm gonna walk through showing you how to use these. Now, when we sew them together, we're going to use a quarter inch seam, and having a quarter inch foot is just the best way to get this done. This is a quarter inch foot.

You'll notice there's a hole right there where the needle is supposed to go through. Then there's this little wall right here. If I slide this very carefully over to this fabric and I kind of slide it on top of the fabric. If I put this little wall running right down the side of my triangle, the needle is exactly a quarter inch away. So it makes it nice because you don't have to necessarily look for your seam allowance.

You just run it on the side of the foot and you'll get done in no time. I'm gonna put this foot on my machine. Okay, that's ready. Now it's time to assemble the blocks. With pieces this small, I rarely pin.

Once we start getting bigger and bigger and we're joining them, I'll probably pin. But right now, I tend not to. So I have a block here, I have a notch right here. Because I have a solid fabric, it has been dyed on both sides, right. It's not printed like this one is, so I can use either side.

So this is kind of my cheat. I'm going to be able to match up the notches like this. So this side has a notch and this site has a notch. Now this is not critical, you'll see why later. It'll just be an extra step for you to clip off both edges.

But if you can manage to get away with it, it'll save you a little bit of time. All right, I have my block here. I've got my right sides together. It does not matter which side you start on. It just so happens that I'm starting on the notch side here.

That's fine, I'm gonna tuck it under my foot. And I am going to hold everything together gently. And I'm just gonna sew all the way across. All right, that one's done. Did you notice I didn't backstage?

I don't have to back stitch because when I assemble these, there's going to be a seam sewn across that seam, which is another method of doing a back stitch. So I'm gonna grab my next square or my next triangle to make a square. Oh, my notches are lined up. I'm gonna tuck this guy under here. Keep sewing, gonna grab another one.

Notice that I am also not clipping or breaking my thread when I'm done sewing. That tends to waste thread and it also wastes time. I of course, have found the most efficient way to do all these things. You know, once you make one quilt, you wanna make a lot more. So you wanna try to speed up the process.

Once you've gotten through all of your stack of blocks, you can pull them and they come out like this. That looks just like bunting, doesn't it? So it's cool because then you can take a little break. You can clip this, go sit in front of Netflix and you can clip all of these apart. So I'm just gonna lay these here and I'm gonna clip them apart.

Okay, so I've got four of them done. What I want to do now is get all of them stacked the same direction. So I want the white face up. So I'm just going to stack all of the whites face up like this. Now, the reason I want to do this is so that I can make my ironing extremely efficient.

So I'm gonna slide my ironing board in here and I have my blocks here. So what you wanna do is kind of set them over on your ironing board, okay. Now I have white here. So I'm a little concerned about what it would look like if I pushed everything toward the white. You can kind of see the seam allowance under there.

See that kind of poking through? Now, even with the black, it doesn't show through. So that's not a big deal, but if you're concerned about it, we're just gonna turn this pile over and I'll show you how I like to iron them. Ironing these things can be extremely tedious, but this is a trick that'll make it go much faster. So if you lay that right there, put the tip of your iron over it.

Okay, the whole point here is to keep this seam allowance flat on the ironing board. We're gonna open this up. We're gonna push straight forward and we're just gonna go this way and then go this way. And then you can do the whole thing. And you'll notice on the backside, it gives you a perfect seam allowance press and you don't have to do a whole lot of work.

So again, we're gonna set this down. We're gonna do the center off to the side, center, off to the side, do the whole thing, done. Bring this one over, center, off to the side, center, off to the side, press the whole thing. Center, off to the side, center, off to the side, press the whole thing. And just like that, we've got finished blocks.

Look how cute those are, so very easy. Now you'll notice on this particular block, I have just a little bit of the salvage showing but it's only about a quarter inch. So when I sew it to the block next door, this will hide. The reason why I do this is, so that I can squeeze extra triangles out of my strips so I don't waste fabric. Okay, so this block looks pretty well done, except for we have this little guy here.

Now, if you weren't able to match those notches, you'll have it on the other side as well. So you'll need to clip both, but I just like to take my rotary cutter or you can use a pair of scissors, and just rotary trim those right off. And now we have all of our blocks for the assembly. So you're gonna wanna finish sewing these all together. And then next, we're going to talk about how to assemble these blocks, how to do your layout, how to assemble them and what to do about the seam allowances so that you can avoid bulk.

I'll see you there.

Get exclusive premium content! Sign up for a membership now!