Learn Paper Piecing Quilting Techniques
Heather Thomas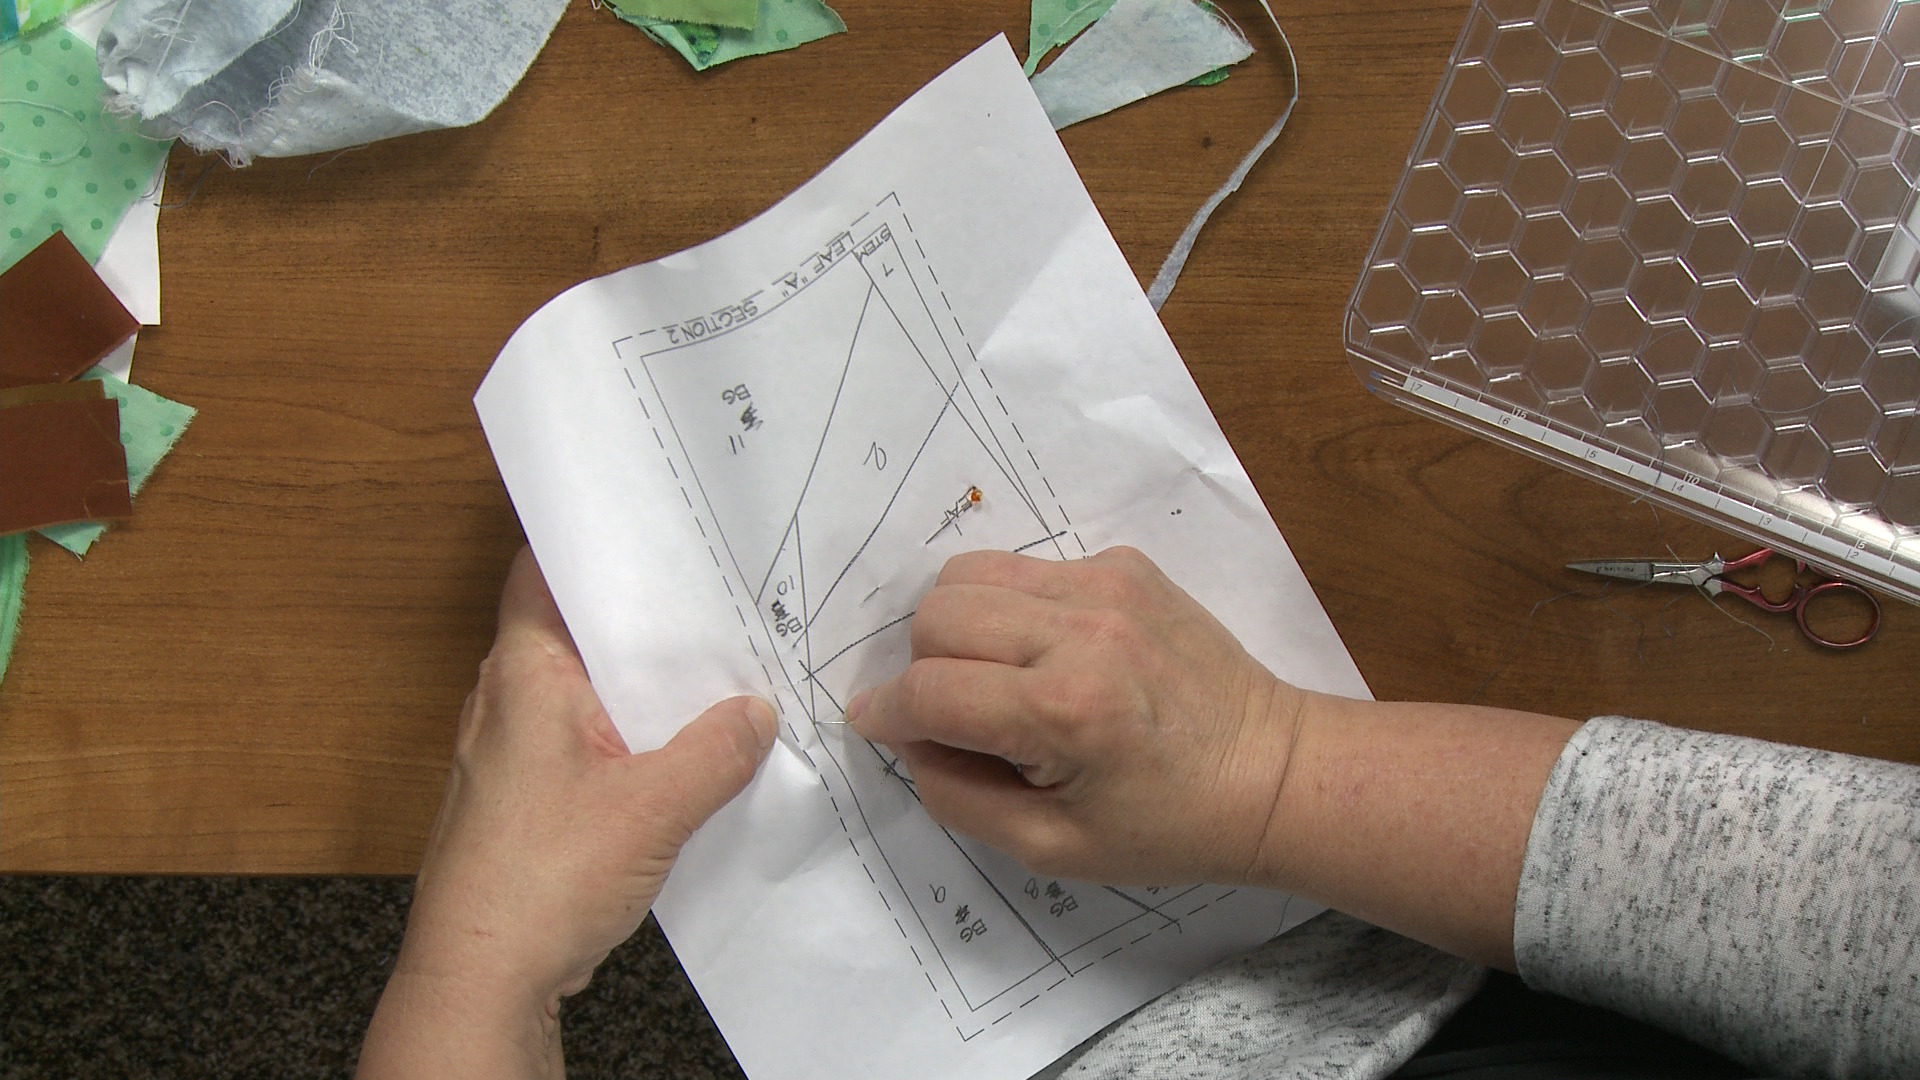
Video Player is loading.
Learn traditional paper piecing techniques and see how a complete block goes together – Heather Thomas shows you how with a fun, decorative leaf design.
Block Designs
When it comes to putting together a paper pieced block, it is important to understand how the block is designed before you attempt to stitch it. Heather explains how a paper piecing block is laid out, what all of the different sections mean and where to start. She also gives tips on how to label each section so you know what color of fabric needs to go where. She also explains why certain designs are made into paper piecing patterns versus regular piecing patterns and what kinds of design elements are easier to complete using a paper piecing method.
Construction
Once Heather explains how to read the pattern it’s time to start stitching the block. She explains that her paper piecing technique is a stitch and flip method, which she demonstrates. She shows how she uses pins to mark her seam allowances before stitching rather than having to measure and cut each fabric section separately. She also gives tips for how to ensure the piece of fabric being used is large enough to cover the section being stitched after it is flipped.
Machine Set Up
While Heather puts together an entire paper pieced block in this quilting tutorial she also gives several tips along the way that can make the process easier. She explains how to adjust the stitch length being used to make it easier to remove the paper from the block once it is done. She also shares how she likes to streamline her paper piecing by using only a couple pins and a small pair of scissors, rather than having to have a sewing, cutting and pressing station all set up separately.
2015 marks my 30th year making quilts. I find that hard to believe. It just amazes me that I've been doing this for this long, but I'm still very passionate about it. I have some old fashioned ideas however, according to what some people are doing these days with their newfangled ideas, which I think is funny because I consider myself an art quilter. But I remember back in the day when the very first paper piecing came out and they were these fabulous little tiny pieces called granny's nannies.
And they came with no instructions whatsoever. And everybody looked at them and said what are we supposed to do with these? And somebody said, I think we're supposed to piece our fabric right on them. And then they started to make sense. And then everybody got on the paper piecing bandwagon.
I myself designed and published probably 100 different patterns that included paper piecing units. And I continue to paper piece to this day because of its accuracy and the fact that I don't have to do any math, and math is not my strong skillset. So I like to paper piece in what's considered the old fashioned way where we actually sew directly onto the paper. It doesn't require a whole bunch of prep work in between steps and it doesn't require me to do any type of precision work during the process. I only have to do it at the very end.
But for a lot of us, it's really hard to understand a paper piecing pattern. And so I've got a few here to walk through so that you can see how a pattern goes together and why it's designed the way it's designed. So this is a star block, a very simple star block. You can see what it's going to look like when it's finished there. And it is in four units.
The reason it's in four units is because it has intersections that could not be pieced by paper if it didn't have these four units. So when we look at this star here, this intersection right here, there's no way it could be pieced separately or I mean together if it was all one piece because of that Y seam. Now, if you were piecing traditionally, and there were no paper behind it, and you were cutting using templates, you could piece that, you could use a Y seam and it could be paced that way. But in paper piecing it can't be. And therefore we subdivide into smaller units.
You always need to make sure that you have that additional seam allowance. So anytime units are separated or a piece of separated into units, you need seam allowance in between those two. So if you're designing your own make sure you keep that same allowance there also. Paper piecing is a flip and sew technique. And you actually sew on the unprinted side of the paper and use the printed side of the paper as a guide.
Here's a heart and it's not subdivided. And when I designed it, I want to design it so that I didn't have to subdivide it. When you go to look at a paper piecing pattern, the first thing you do is try to recognize the numbering sequence. So here we have number one and then two is added. Then three is added, then four, then five, then six, then seven, then eight and nine, then 10, 11, 12, and 13.
The numbering sequence is important because if the lines cross over each other, not intersect, but crossover, then one has to go on first before the other does, otherwise they can't cross over the way they need to. In this particular heart or pattern, I put the word heart here so that you would know that's the fabric for the heart and BG for background so that you would know that space is occupied by the background fabric. That way it helps you a bit more. This is also a paper piece block. Again, didn't have to be subdivided because in the flip and sew process, I can continue to work from a center most area and flip and sew all the way out.
So we start here with one and it's a window, w, two H house fabric, three H house fabric. So flip and sew, flip and sew. So once this unit is done, then four house, five house, six door, seven house, eight is the top of the house. So you can see that I'm building from a center most point and building out. And as long as I can do that, then I don't have to subdivide.
So you'd really need to get to know the pattern that you're going to paper piece and understand how the designer was putting that piece together. Leaves are a favorite of mine. And so this is a leaf. And if I were to fold this back on this dotted line, you would see here that these are the two halves of that leaf. If I fold it back on the red line, which is the finished line and joined it with this red line, you can therefore see that finished block.
So we have leaf, we have a stem and then we have areas that all say BG, which stand for background. And you can see that there was no way that I could put a curved piece in here with paper piecing, it couldn't happen. It could have been done with regular piecing, but then you'd have to do a curve seam and you'd have to use templates to cut your pieces with and this way we don't do that. But to achieve this reticulated curve here, we have to sew on lots of small pieces of background. And one nestles into the other, nestles into the other.
And you can see that they cross over. And so if there's a crossover, it can be done. If there's a Y it can't be done. So the leaf is what we're going to be piecing today. And I went ahead and pieced one half of the leaf.
So this leaf is done, it's ready to go. It is this one right here, but not really. It's actually this one right here, because we piece on the back side. So that can be confusing. What I say is trust the pattern and simply follow it blindly.
Don't try to figure it out as you're going. Don't try to make sense of it. Just follow the numbers. However, what I want to do on this guy right here, which is going to be the other half of the leaf is I want to add some definition to the leaf by putting segments in there. And you can do that to any pattern that you want to.
So if there's a paper piecing pattern that you want to do but you want to make some changes to it, you can, as long as you don't create that seam that can't be stitched, that Y seam. But I'm going to come in here and I'm simply going to add some diagonal lines across the leaf so that this half of the leaf will be a little bit more interesting than that half and together they'll make a really cool leaf. So I'm just going to use a ruler and I'm going to mark lines here. And this way you'll have a better understanding of how that numbering system is going to work because I'm going to change the numbers. Okay.
So now I'm going to have piecing in this leaf, instead of the leaf all being piece number one, it's going to start with one and then two, three, four, five, and six. Now this was one, I'm just going to follow these numbers and change them. Six was my last one. So this is seven. This is eight.
This is nine, and 11. Now the reason I can't put this one on before I put this one on is because if I sewed this one on there's no way I could get that piece of paper down into there. So it's important that I follow the numerical system. Now you can measure and cut your fabrics so that they are perfectly sized for the units or you can do my favorite thing which is the eyeball method. And I use it for almost everything that I do.
I know that in paper piecing, that none of this has to be perfect. It isn't until the very end when I turned this piece over and I straightened up the edge so that I can join the two together and sew them with other blocks of the same size, it isn't until this point, when I'm doing that straightening up, that any measuring really has to be perfect. Or whatever that word is. Here instead, it just needs to be big enough. And one of the mistakes that people make most often when they're paper piecing is they don't understand how big it needs to be when there's a big, long angle.
So if there's an angled piece, how long does that piece need to be? How far does it need to extend so that I don't up without seam allowance? And so one of the best things that you can do is use a pinning system. And so I always have these pins around and I use them to measure my piece of fabric and I use them for positioning of my fabric too. So if I'm working on the leaf section number one, I'm going to grab a fabric.
Let's say this one, and this first one I'm not going to use, let's see scissors right here. I'm not going to use the pin system for the first one because it's easy to look at it and say, yeah this piece is going to be big enough if it's this direction. So I'm simply going to cover that number two with this piece of fabric. So I'm going to turn it over. And this is the only time that I'm ever going to hold it up to the light to get the size.
And I'm simply going to hold it up to the light and cover that whole section that is the number one section. And when I do it, the line, the seam between number one and two is the only seam I'm going to be worried about and I'm going to put the fabric so it is directionally covering that. And if we put this fabric down, well, we can't really see through this light, but I know that that fabric is back there, covering there. And I'm going to pin it in place from this side so that it doesn't flop about. Now, this is when my pins are going to come into play.
I'm going to take two pins and that's all I need are two pins the whole time. And I'm going to find the seam right here between one and two. I'm going to take those pins and I'm going to put them at the end of the seam line, right here. And I'm going to angle them towards the piece I'm sewing on. And I'm going to bring that pin out approximately a quarter of an inch away from that line.
So there and there. So again, this is the same outline I'm going to sew right here, I've put a pin at the end of the seam and at the end of the seam. And I brought that pin out back to the surface of the paper, approximately a quarter of an inch away. What I've basically done here is I have marked the seam allowance. I now know exactly where to place my fabric on the other side.
I also know for this particular piece, that I really only need the normal quarter-inch excess on either side, which is the way it is for most paper piecing, but I'm going to have a couple of long seams here that you'll see that I will need a longer piece. Now, when I come to the back, all I have to do is find those two pins. And that's going to tell me where to put my next piece. But before that, that's going to also help me with the size of the piece I need. So I know that if my piece is long enough to go from pin to pin, then the length I need.
And I need to make sure that it's wide enough and that's all I have to worry about. So here's my width. I'm going to clip and rip. Why would I go cut it perfectly? There's no need to, I just need to make sure it's going to cover that piece.
And I know that it will. When I come to this side, that's what I'm going to lay it so that it covers this pin right here that you can barely see and this pin right here. And I'm going to match the angle of those two pins. Then when I go to sew it from the other side I'll be using a quarter-inch seam allowance and it will be able to flip and fill the spot that it needs to fill. So let me grab my sewing machine and we'll get sewing.
So I'm pretty much ready to sew, I have marked my seam again with pins on the end between the two areas I'm going to sew, which are one and two, I've brought the pins out a quarter of an inch away from the line I'm sewing. And the reason I do that is so it can mark the seam allowance on the opposite side, and I've angled those pins toward the direction of the new piece I'm sewing on. It's very important if you're using fabrics that have a right and a wrong side. So this one has a right and a wrong side, that the first fabric you lay down is always face up. And after that, every fabric you lay down his face down.
Just remember right sides together. As long as you have right sides together, just like you would with any type of piecing, you're going to be okay. Now you can see the two pins here, one here, and one here. And all I need to do is make sure that I cover those two pins there and there with equal amount of excess on both sides. Now there are exceptions to that equal amount of excess on both sides rule.
And I'll show you that in a few minutes. Now, I simply need to hold those fabrics together so that they don't shift and put my fabric underneath the machine, and I'm going to sew. I'm going to extend the seam about a quarter of an inch before the line starts and about a quarter of an inch after it ends. And I don't need those pins anymore. They were just marking my spot.
The most important thing is that I need to make my stitch length closer together. And we do this for two reasons. So if you normally sew on like a two and a half, go down to a one and a half. We do this, one, to make the paper come off much easier. And two, because a lot of times we're doing some pretty narrow seam allowances because we have maybe 15 pieces of fabric coming together and we need to have those seam allowances and narrower.
And therefore, because there isn't as much seam allowance which actually gives us security in a seam. We need those seems to be sewn with smaller stitches to really hold it together. So I'm going to go ahead and just sew this seam. And just like with other piecing, we don't have to backstitch or not offer anything. So you can see the same as sewn here, extended a quarter of an inch past the beginning, and the end of the line.
When I turn it over, you can see that I've got approximately a quarter inch seam allowance, which is exactly what we're wanting. Now. I don't want any excess fabric before I flip that over to fill its spot. So I'm going to grab that seam allowance and fold the paper back and quickly cut away any excess fabric. You can do this with a rotary cutter next to you if you want to.
But the way I see it, every time I have to change tool systems, from scissors in my hands, right in front of my machine, to moving over to a rotary cutter, it actually takes longer. Now I'm going to finger press. Flip my fabric over, and with my two pointy fingers here, after I flipped it over and put it in place, I'm going to start in the middle and push to each side. If I start on one end and push all the way over, by the time I get over here, I ended up with rumples. So starting in the middle and pushing to each side is the better way to go.
Turn it over, find my next unit I'm going to be sewing on, which is number three, which I'm now changing directions. Find the seam allowance or the seam between number one and three, put my pins so that they come out a quarter of an inch away, a quarter of an inch and quarter of an inch, moving towards the number I'm about to sew on. That's going to show me exactly where to put my fabric, but first I need to know how big that fabric needs to be. I'm not going to pull out a measuring tool or anything like that, I am going to eyeball it. So I'm simply going to lay down my fabric, make sure that it is big enough, clip it and rip it.
Now, no this technique is not for somebody who is very, very, very, very thrifty because you are going to end up with fabric leftovers, little scraps that who knows what you'll do with. So now I'm simply going to lay this down again and I'm going to cover those two pins with equal amount of excess on both sides. And I know I have my fabric in the right place. Turn it over again, position it under the machine and remove those pins. Grab that seam allowance, fold the paper back, quarter inch, I always like to use a scant quarter inch.
Flip it over and finger press. Now I'm going to mark the seam between three and four. Choose a fabric. Clip it and rip it so that it's big enough. Not quite big enough.
So I'm going to do that again and I'll use that for a different piece. 'Cause I don't want to have to mess about with the positioning of that. I want to make sure that it's totally big enough and I don't have to think about it. So turn this over. Again, I'm going to use those pins as my measuring, set that fabric so that it covers both pins with excess on both sides.
Remove the pins and sew. If you want to, every fifth or sixth piece of fabric that you lay down, if you want to go to the ironing board and do a crisp press, feel free to, but I've never found it necessary. Oops, okay a little gathering of fabric here, which can happen, your fabric turns over a bit. I'll see if it's part of that seam allowance and it's not, it's way over here, so I don't even care. I'm going to flip this back and trim that seam.
And finger press. And now our last portion of the leaf. And I'm going to take this piece of leaf that I used before, down here that I cut off, make sure that it's big enough easily, which it is, depending on which direction I put it, it's going to be just fine. And I'm going to go ahead and use it. So depending on what pattern you're doing you can use some of those scraps right as you're paper piecing your units.
Now one of the hardest parts about paper piecing is removing a seam if you've made a mistake and I'm going to show you a way to make it a little bit easier if it happens. So if you were to discover that you sewed on a piece of fabric that wasn't large enough or was in the wrong direction, or you didn't like it, I'm showing you that because we're going to do that issue right now. So if I've done something that I don't like and I need to remove a seam, the best way to do that is to pull it up like so and use your rotary cutter to clip that instead of trying to use a seam ripper. But what I did just now, I did on purpose because this is something that happens all the time, I've pieced about, I don't know, I'm going to guess 200 Mariner's compass blocks and they have really elongated angles. And this has a very short angle here on the top but it has an angle and angles are some of the hardest things to figure out how to make sure you have enough fabric when you do your flip and sew.
So when I look at the front here, I can see that my piece of fabric and you can't see because it's hard for you to see through the paper is not quite covering the area it needs to cover. So I'm going to show you that my fabric is ending right here. And when I bring that pin through you can see that it's short. It's not going to cover this corner. Now I could do one of two things.
I could take that piece off and put a new piece on or I can simply add on. And I'm just going to add on, because I know I can do that. It's not a big deal. So I'm going to say, okay, well, I'm going to add on at an angle and I can mark it if I want to, whoa. I can mark it if I want to.
So I can take my pencil and mark a line right there and add another piece. So I'm going to go back to a color I've used before, probably this little polka dot and add another little piece. So instead of having to take something off, I'm just adding something on, and adding a little bit interest to the tip of this leaf. So there's that. And I'm going to mark that with my pins.
One there and one there. So you can always fix the issue. Put my fabrics there. And sew. One of the things that will help you as you're learning more and more about quilting is that you have options to fix things the way you want to fix them as long as you have the tools to do that with.
And usually that tool is knowledge. Okay, so the leaf portion of our piece is now done. It doesn't look like a leaf at all. And we look at the back here, we see that everything is covered and everything has been sewn. And now we're ready to do our background area.
And our background area is another fabric that has a right and a wrong side. So we have to make sure that we're using the proper side when we do this. When we're looking at our numbering system, we're going back to the top up here, where we were just working. And we're going to be basically fanning around in a half circle, as we add each new piece. Now I don't want to use one big, long piece, it gets in the way.
But I do want pieces that are going to be long enough to do from this seam allowance out here, each one's going to start out here, and then it needs to go at least a quarter of an inch past the end of that line. And so when I'm measuring length, that's what I'm going to do. But I know that I can probably get two pieces out of the width of this. And this one's a little bit longer, so I'm going to measure it first and then clip and rip my piece, or just rip my piece, that length. So that I know it's long enough for that piece there.
Then I'm simply going to cut it in half, but I'm going to cut it in half so that I know that this one is a little bigger than this one. So I'm going to cut it in a little more than half on one side and a little less than half on the other. And I know that these two pieces are going to work for these first two pieces. So again, the first thing I'm going to do is mark my seam. And my seam is going to start up here and I'm going to be angling those pins towards the piece I'm putting on.
And it's going to go all the way down here. So it's going to cover up pieces five, six, and seven the ends of that leaf. Turn this over, and because these pieces just are big enough, my placement is important. I want to make sure that I just barely cover those pins. If I go too far over then my piece might be too narrow and it may not cover the area that I need it to cover.
Perfect quarter inch seam allowance back there which is what we were looking for. Again, I want to get rid of all of these fabrics, especially if my background fabric is lighter than my fabrics, the colors of the fabrics I'm using in my leaf, I don't want those fabrics to show through. So what I'm doing right here is called undercutting. I'm cutting the fabrics a little bit shorter that are behind that background so that they don't show through. I flip that into position, finger press, come to the back, grab my pins again and keep marking.
Here at the end of this seam, and over here. And that seam quarter of an inch away. This might be a little chunky quarter of an inch away. So again, if I cover that and cover that. So this is the easiest way I know to mark and position for paper piecing with all those angles.
Sometimes you have to pull the seam allowance off the paper so that you can get it up and that's okay. you're not hurting the piecing. Just try not to rip stitches as you do it. And you can see that if you start thinking about what this is supposed to look like in the end, you'll drive yourself crazy, because it doesn't look like a leaf at all. So just blindly follow those numbers.
Now we're going way down here. So our piece needs to be pretty darn long. So I'll take a new piece. Now, I could cut this off if I wanted to, but why? I'll just leave it the width of it is.
And when I go to trim the piece, I'll have that excess piece there and it'll go in my... so my pin is way down here. It'll go in my stash, cover those two things. Now I just want to make sure that I don't have any big, long angle, which I really don't because this piece is going to cover this end. If this was an elongated angle, I need to make sure that I had lots of excess down there, which I don't need.
Again, trimming those seam allowances. Now I've just got this little guy here. And one more piece after that. Make sure that any loose fabrics underneath are in position and not turned over. So this one's loose and I don't want it to be turned over.
Just need a little piece for this. So I think I can use the end of that. Cover both pins. Flippy fabric. Yes, it would be better if I had a big pair of scissors here I just don't have them handy.
So I don't recommend using your thread scissors to cut fabric, but that's what I have. And we have one more background piece and then our stem. So our last background piece is a really long squat, or I should say tall squat, almost triangle. And I'm probably just going to work with this piece right here. See if it's wide enough that way, it's not, but it's definitely big enough this way.
So again, I'm covering pins there and there. Right sides together. And our last piece is going to be our stem. And our stem has a really elongated angle, and so it's a great final piece to learn how to make sure that we get that angle position correctly. We're going to come in here and we've got this great angle, very, very long.
And so you can see how long that tip is. And our fabric is going to need to come at least down to here so that we can sew and extend that seam and not have it come loose. So we don't want our piece to be too short. There's always that risk if we are trying to economize on fabric. I'd rather economize on my time and not have to do the thing over again and make sure that I have enough fabric the first time.
So mark that final seam, quarter-inch, taking those pins out in the direction we're selling the fabric on. Cover both of those pins, here and here. All right, so now our other half of our leaf is finished. It doesn't look anything like a leaf. But it will, once we star trimming things away.
And this is when we're gonna worry about things being quote unquote perfect. All right. There we go. So now we're just going to trim these two units using our rotary cutter, along those outside dotted lines. And then we can sew the two halves of our leaves together.
So we'll get our rotary cutter tools out and we'll do some trimming. Well, before I trim this I want to correct a little issue that I did not take care of earlier. When I added all of these sections to the leaves and we renumbered the background, we came all the way around to here, ended with 11, but I forgot to change the number on the stem. So if you were counting, the stem was number 12. Okay?
So now we're going to simply trim. And we're going to trim on the dotted line. Some patterns will come to you without a dotted line and they'll tell you to trim a quarter inch away from the printed line. So read the instructions there on your particular pattern. If you don't see a seam allowance, chances are the designer either assumed that you would know that you would need a seam allowance or it's written somewhere in the instructions to do that seam allowance.
There's a lot of brouhaha about paper and rotary cutters, but I was told by people who actually work for Olfa that paper sharpens scissors and cutters, just like the grinders that they use when they sharpen them. Okay. So here is our leaf. Isn't that going to be fabulous? All we have to do is so the two halves together.
Now, some of you are looking at it going, ah, what's that? That raw edge, that just gets caught up in the seam allowance and this will come to a nice little point. So no worries. I'm going to put these together. Now rarely will I pin paper pieced units unless I've taken the paper off.
The reason I don't like to pin them is because the pins really distort them. I will pin them if I can pin them far away from where the seam is, so that it's not distorting in the seam. So this is a very big block, and I know I can get these pins way back here just to hold those together. And that pin is not going to distort the seam. Whereas if I have it way up close, it is going to distort where the seam is and it's going to make it hard to sew it.
Now you can change back to a regular seam allowance if you want to, but I keep it small because there's paper on and it will make that paper easier to remove. And there is our wonderful, beautiful leaf block. Very cool. Paper pacing allows us to do all these wonderful angles and get these funky shapes without having to use templates. If I had to cut templates for each of these, I would probably just be finished with all my template cutting.
And even though paper piecing isn't the quickest technique, it's very accurate and allows us a lot of freedom and not having to use all of that perfection. The removing of the papers should happen very very easily because we've used that small seam allowance. And it basically just falls off. If you've used that small seam allowance. Also work in reverse numerical order.
So you're going to start with the outside pieces and just pull it off as you go in. So this is not something that is difficult to do. If you are doing a queen sized quilt, and all the blocks are paper piece, I suggest taking the paper off as you finish the blocks rather than waiting till the very end, because then you feel like you're being punished by having to remove paper off of 29 blocks or so. It gets a little boring. When my kids were younger, I used to pay them a quarter to remove the paper for me, and then they got older and wouldn't do it for a quarter and I couldn't afford them anymore.
You can use pins for those big angles to stick down in there and pull that paper out. If it gets stuck in there. And if you're a washer, it will come out in the wash. You can just see that that seam just basically separates the paper if it's small enough. And I'll worry about the rest of this later, but I just want you to see the finished block without the paper on.
And I always press these seams open, these big heavy seams, here. But if I've got a side that has fewer seems like this site has fewer seams, I can also press in that direction. So we'll go ahead and just press that with our fingers and then eventually we'll take it over to our iron and there we are. Paper's gone, block is ready to go and we've got this great leaf. So if you've ever wondered how that paper piecing works now you know.
You can practice it, try my pinning method. And I think you'll find a lot more success.
Share tips, start a discussion or ask other students a question. If you have a question for an expert, please click here.
Already a member? Sign in
No Responses to “Learn Paper Piecing Quilting Techniques”