How to Make a Dozen Layer Frayed Quilt
Heather Thomas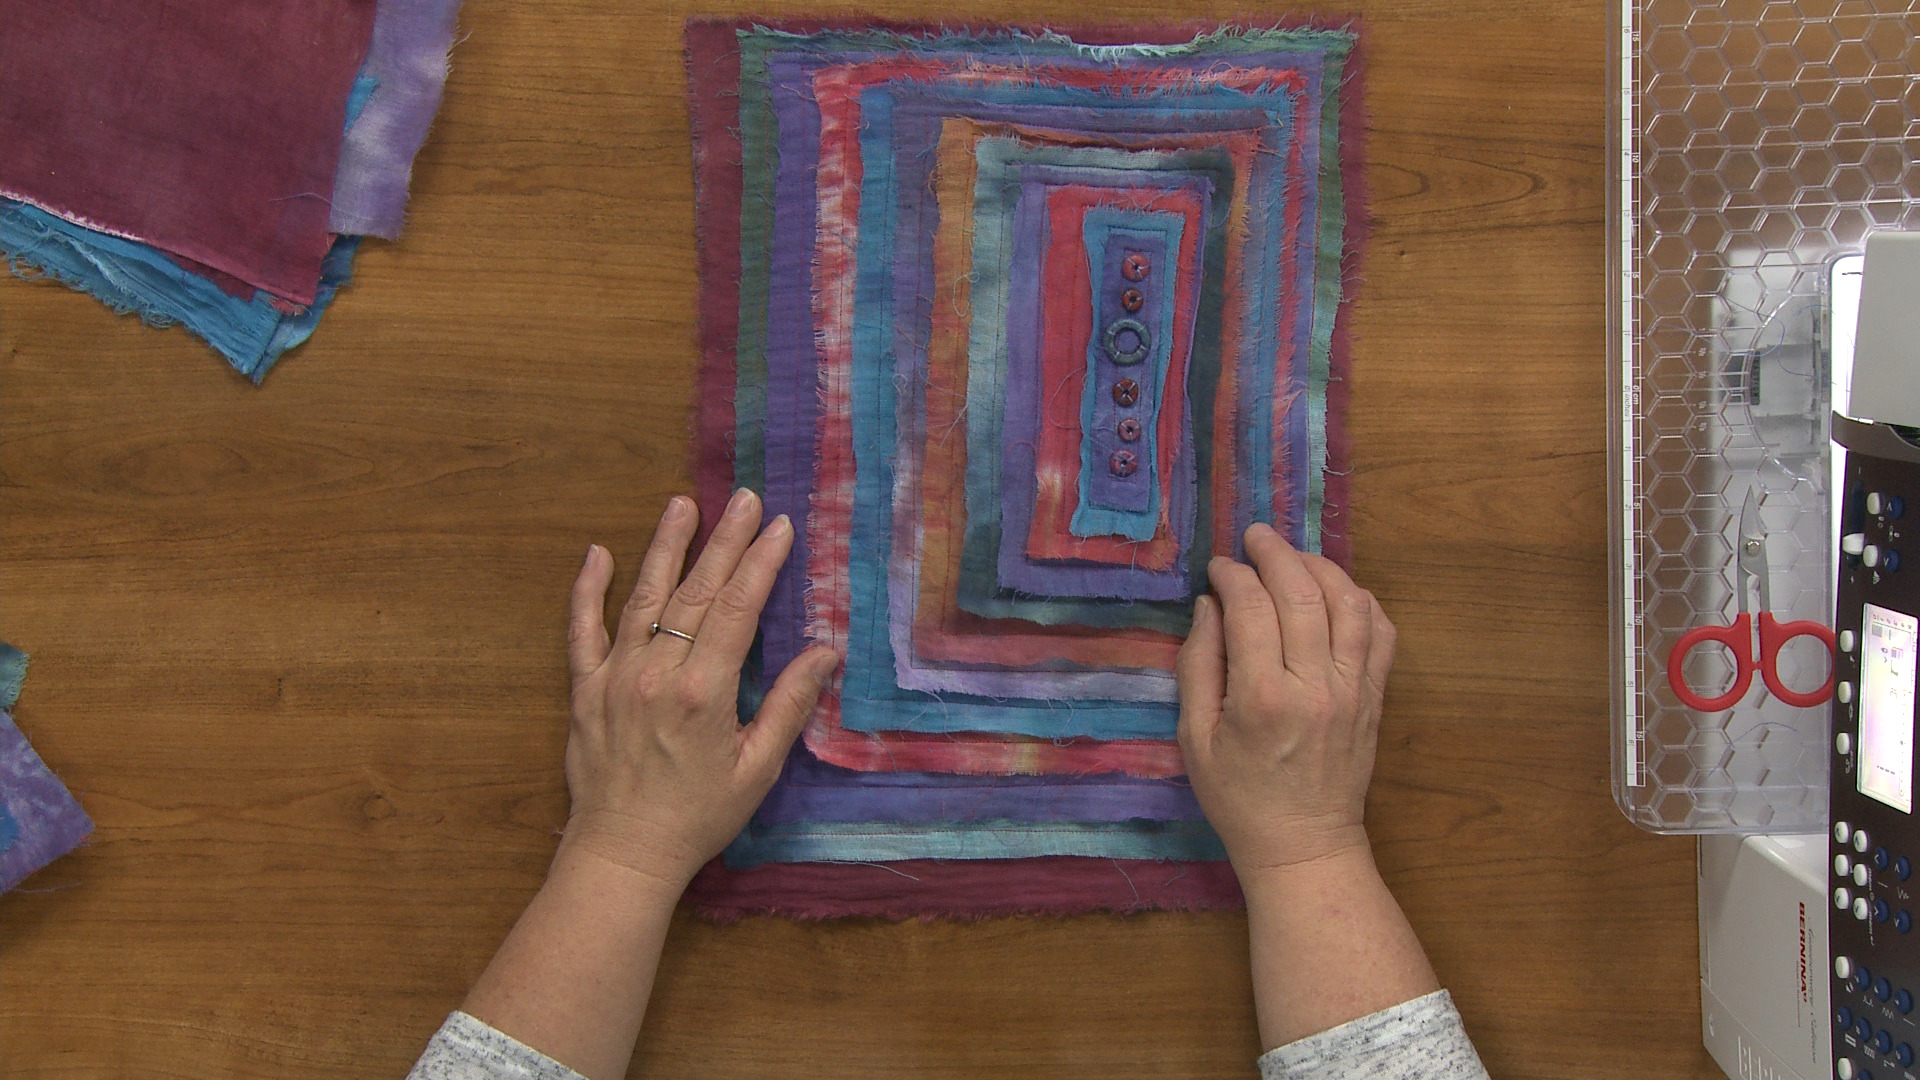
Video Player is loading.
Using a fabric that easily frays is a great way to add texture to a quilt along the raw edges of a piece. Heather Thomas shows you how to make a fun frayed quilt using cotton gauze and a quilt as you go technique.
Supplies
While quilts are commonly made using cotton fabric- cotton gauze looks and feels entirely different. It is a light weight, loosely woven fabric sometimes called shot cotton. Heather explains some of the reasons why she chose to make her frayed quilt using cotton gauze, including sharing how cotton gauze is colored and why that makes it a good fabric to fray. She also shows what kind of batting to use for this project and explains why a different colored batting is the best choice.
Construction
When it comes to making the twelve layers that make up the frayed quilt in this quilting tutorial, Heather doesn’t use a rotary cutter and mat. Rather, she explains how part of the artistry behind this project is that the lines don’t have to be perfectly straight and the rectangles don’t have to have perfect corners. She demonstrates how she uses the largest rectangle piece as a guide to cut the next smallest rectangle and works her way towards the center. She then demonstrates how to stitch the rectangles in place and explains what seam allowance and stitch length should be used. By stitching through all of the layers of fabric and batting at the same time Heather is both quilting as she goes and eliminating the need for piecing her art quilt.
Finishing
Once all of the layers have been stitched down the edges can be frayed to give it more texture. Heather shows how that can be done by pulling out fibers along the raw edges of the fabric. Washing and drying the quilt can also cause the edges to fray more.
I really like to make small art quilts and I'm always looking for new and different ways of bringing fabrics together and creating something with them. And not too long ago, I was in a gallery and I saw this small art piece that was made out of paper. And it was all this beautiful colored handmade papers that were layered on top of each other in descending size. And it was a little small piece and I thought, "Ooh, that would be a great idea for a quilt." And then I realized that I could probably do it in small units like this and then use a quilt-as-you-go technique and join them together into a larger piece if I wanted to. And so, this is probably going to become a table runner with several more of these units attached to each other.
The fabrics I decided to go with are a very loosely woven cotton gauze and they're very similar to what's called shot cotton, and that's spelled S-H-O-T, shot cotton. And you can get that at quilt stores. A lot of stores, if they carry Kaffe Fassett fabrics will carry his solids, which are shot cottons. What's nice about them is that they're woven rather than printed, and they're yarn dyed, meaning that the yarn is dyed before it's woven rather than the piece being dyed after it's woven. And you just get a slightly different look.
So they're gonna feel quite a bit like these cottons. And they're just drapey and they just have a nice, really nice feel to them. But the coolest part is that, when you rip them instead of cutting them, you get this wonderful fray to the edge. And that fray can be used as a part of the artistry in the piece. And that's definitely what I was trying to have happen in here.
Now, a lot of these I didn't rip, I cut and I'm gonna cut and show you how I do that. But that doesn't really matter because after I've finished piecing the whole thing together, I can just pull out those fibers and I'm still gonna have that fray, even though I cut the fabric. I'm still gonna have that wonderful fray and it's easy to pull the fiber. So cutting 'em is not a big deal either. What I started with on this is a piece of dye painted batting, you can start with just a regular piece of batting, but I would probably go with black batting rather than the wider off-white.
It's simply going to look better if it shows and the black would help show off all of your colors. And then I simply started ripping or cutting rectangles that descended in size and then layering them on top of each other. I decided on this one to offset them, but the next one, I'm going to set them from the middle out. And if I do that every other block, I can join these together and make a long table runner. And I think that'll be a beautiful table runner.
The cool thing is, is that every time I wash it, it's gonna fray a little bit more and fray a little bit more, and it's just going to end up being this wonderful fluffy thing on the surface of the table. I also added some embellishment with some bone beads and I'll do that on all of them too, just to add some extra interest to it. So this is really an easy technique. I've got the beginning happening over here and I've taken another piece of that dye painted batting. My base layer is cut or ripped just slightly larger or about the same size.
It shifted a bit here, so I'll shift it back so it covers that batting entirely. And then I just started cutting layers. So I simply lay a piece of fabric on with the same amount of excess hanging over on two sides and then fold and cut. And so, I'll kind of show you how I do that. So my next color, because I'm kind of going violet, blue, red, violet, blue or green and red, violet.
So now I'm up to blue here. We'll see if this one's large enough, which it is, okay. So I'm going to put two ends, right, the right side and the top, and the top's a little crooked so I'm gonna kind of straighten that out a bit first, and you can see I'm not being perfect. I really don't care, because I want it to fray later. And yes, a big pair of scissors would come in handy but I don't have a pair handy so I'm gonna just use the small ones.
Now, to cut this to size, I'm simply gonna fold this fabric up so that I can reveal about as much of the fabric below as I want. And I'm gonna keep it folded, insert the edge of my scissors and cut and pull as I cut against that fold. And, that's about as accurate and perfect as I'm gonna be on that. And I'm gonna do the same thing this way, I'll fold this over so that I reveal what I want to, of the fabric below. And again, insert those scissors and cut off the excess.
I don't like precision anymore. Somewhere along the line, I was watching a video about art and this young artist made the statement that the beauty was in the wobbly line. And I started looking at the art that I really loved, whether it was Picasso or let's see who else, Van Gogh, any of the artists that I really thought were fabulous painters. And I started watching their line and realized that they have been perfectionists when it came to their colors, they would work on color and color and color. But when it came to their line, their line was very natural and it had a crookedness to it and a wobbliness to it.
And the beauty was in fact, in the wobbly line. So I use the wobbly line a lot. So that's how I cut the next piece. No measuring, no getting out the rotary cutting tools, none of that at all. Now, when it comes to sewing this, I was sewing layer by layer rather than putting everything together.
But I wanted you to see what this looked like with everything together. So I'm just gonna take off this top portion here and I'm gonna pin these two together and I'll show you how simple the sewing is. You decide whether or not you want those seams to all show or seams to not show. I decided I wanted them all to show. So I knew I needed to keep them somewhat close to the edge but, because of the nature of this fabric and the fact that I want it to fray, I need to make sure that I don't get it too close to the raw edge because I want it to be able to fray up to the stitch line.
And if you make your stitch smaller, your stitch length smaller, you don't need to worry about it falling apart or anything like that. So if you normally sew on a two and a half then you're gonna wanna go down to about a one and a half. Which is where I'm at. Okay, and I'm going to keep the edge of my foot, I'm gonna use the edge of my foot as a guide. And I'm gonna keep it approximately a quarter of an inch away from the raw edge, which means I'm gonna have about a half inch all the way around.
Because of the nature of this fabric, I'm going to end up with little puckers and pleats and I don't care. It's gonna actually add an element of interest. Now you could use batiks just as easily on this. It's just any fabric that when it frays, you're not gonna see the white back of the fabric, the downside of batiks is that you have to take, it takes some work to make them fray. And then I'm just gonna overlap the beginning line rather than nodding off.
And that way it's gonna be nice and secure. So basically I'm appliqueing and quilting at the same time, going through, all the way through to the batting. And at this point, I would add the next layer. Position it, and you see that it's sitting right inside that stitch line so I can see the stitch line. And you see, I leave those pins in so I can just move their position, like so.
And I'd stitch around it again and I just keep doing that layer after layer until all 12 layers are stitched down. And I end up with this fabulous, very textural very funky little quilt that I can either use as a block in a larger piece or put some drapery O-rings on the back that I hand stitch on to use to hang it and hang it from my wall. I can make these wonderful layers stand up. I can fray them. I could throw this into the washing machine and into the dryer and let it really fray up.
I could have all sorts of fun with it but what I've done is simply eliminated the piecing, gone straight to layering things together and stitching, which is essentially quilting them down and using a very fun alternative fabric instead of my normal everyday quilting fabric. Give it a try, go out and search down some really funky fabric and layer up a dozen layers and make this wonderful little quilt.

What kind of batting did she use?
Thank you for this video! I know some fabrics fray better than others, but can I use any fabric I want for this technique? Thanks so much! Marj
for some reason I have not been getting e mail from quilters guild even though i am still a member,bit annoyed about that as i wasted my membership time but oh! how I have missed you Heather I love your ideas some so off the wall great ! You are the reason I joined because like you I love fresh technequies and pushing fresh ideas Fab!
Thank you Heather. This looks like so much fun and would make really unusual gifts.
What is the approx size of the largest, base fabric rectangle?
How does Heather join the rectangle sandwich pieces together for a table runner? Each one has so many layers!