
How to Clean Your Sewing Machine
Ashley Hough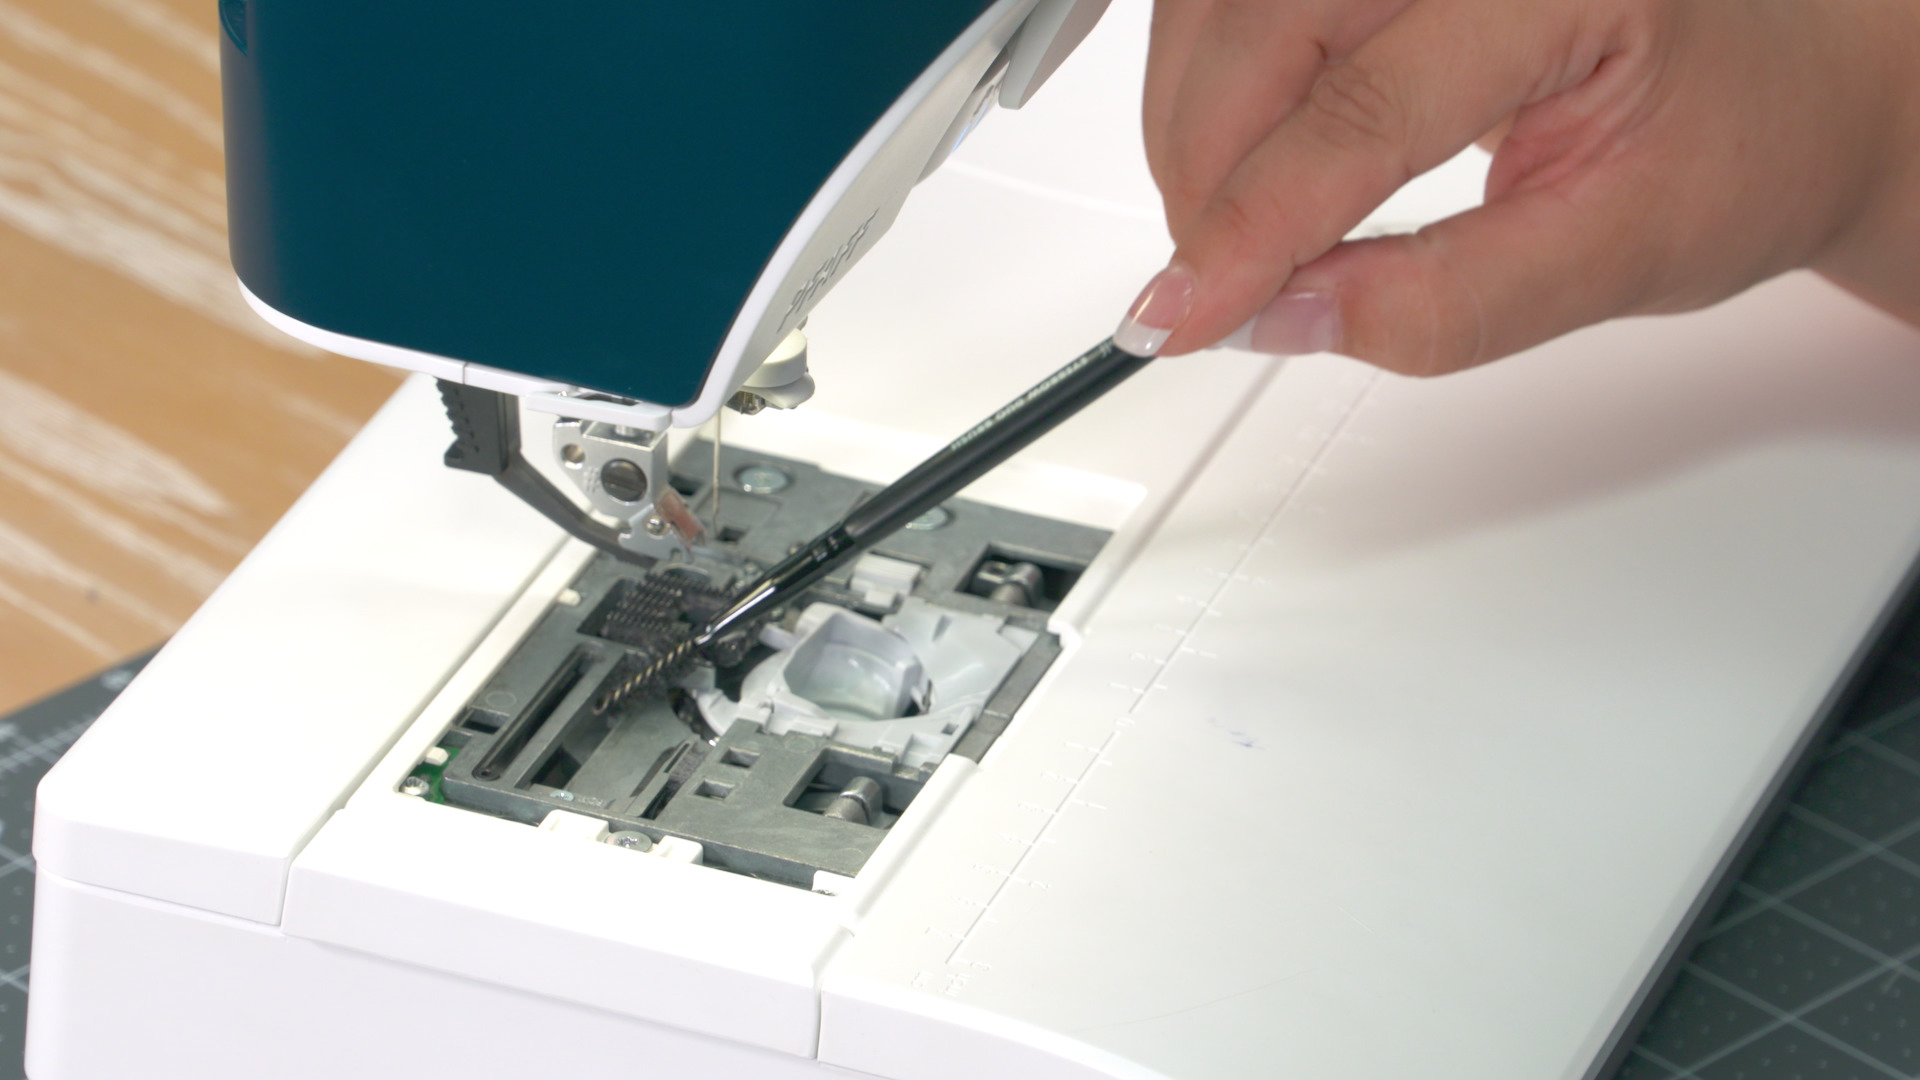
Video Player is loading.
Purchasing a sewing machine can be a wonderful investment. As with all tools, it is wise to learn about sewing machine cleaning. Whether you sew daily or once a month, we have valuable suggestions on where and how to remove the lint and threads that can be hiding near the bobbin area of your machine.
Join Ashley Hough, our knowledgeable quilter, as she provides the basics you need on how to clean sewing machine parts. This includes how to clean bobbin case areas. The anatomy of a sewing machine can vary from brand to brand, but the concept remains the same. Dust and lint build-up around the tension disks, feed dogs, and the bobbin case can create issues with balanced tension and proper stitch creation—all things we as quilters and crafters would rather avoid. There are times when qualified technicians need to do sewing machine cleaning, but in between those deep cleanings, we can do much to keep them working smoothly.
Ashley introduces you to a few simple, inexpensive tools that can be used to remove dust and lint clusters. She demonstrates how to maintain sewing machine areas that are exposed to excessive lint and are places we can successfully clean ourselves. The first thing she demonstrates is cleaning tension discs. As thread is guided through the discs at high speeds, dust is produced that can build up and cause issues with even stitch production. This “flossing” of the discs can easily remove tiny threads and excess lint.
Next, we walk you through how to clean bobbin case areas. This process can be intimidating, but becomes a necessary part of maintaining your sewing machine. A lint-free, clean bobbin case is the goal. As you remove the bobbin cover, bobbin, and throat plate to reveal the lower working of your machine you will encounter dust that clings to the working parts of the bobbin area. Gently remove all lint and thread pieces. The bobbin case can also be removed to reveal any lint that builds up in the shuttle area. Care should always be taken to lift lint out of the machine. Using compressed air can drive lint deeper into the machine, causing more issues.
After cleaning, replace all parts in the order removed. Cleaning between projects can extend the life of your machine.
Whether you sew every single day or maybe you only sew every month or so, it's still important to clean your machines. I'm gonna show you some of the basics of where you should clean and essentially just dust your machine. Sometimes eventually you will have to take your machine in to be serviced or do a deep clean, but there are some basic things that you can do. Preventative maintenance cleaning that you can do and that you should be doing on a regular basis to your machine. And it doesn't require any really special tools.
So if your machine came with a little bin or a little box or bag or something. Of all the specialty presser feet, maybe some extra bobbins, probably came with some needles and it probably came with a couple of tools to clean your machine. One of those is usually this one here, and it's just a simple little, teeny tiny brush. And it has fairly stiff bristles on it. And it's a small little brush, easy to keep with your machine and easy to use.
Another brush that may have come with yours machine is a wire bristle-looking brush. But let's say that you lost that brush, you can't find it. It's been years since you've purchased your machine. A good replacement is actually something that can be found in the makeup section of any store. And that is it's actually an eyebrow brush.
So it has these little, it's like a pipe cleaner on the end, but they're fairly stiff bristles. And because it's a makeup brush versus one that came with your machine, it actually has a much longer, easier to hold handle. So this is actually what I use to clean or dust out my machine as opposed to the tiny little one that came with my machine. The other thing you're gonna need is just a scrap of fabric. Doesn't need to be very big, it just needs to be something that you can take and fold in half.
And we're gonna use this as a little bit of a dusting rag. It doesn't have to be microfiber or some special dusting fabric. You can just use regular cotton fabric. So the first thing that I'm gonna clean is something that I think a lot of people don't think about cleaning or having to dust out. And that is your tension discs.
So your tension discs are up here. They're up here on this machine. They should be in a similar position on your machine. And that is where, when you thread your machine your thread has to go through a tension disc before it comes down to your needle. That means your thread is constantly running through or next to or against those tension discs.
And depending on the thread you're using, it's putting off some lint. So you want to dust that out or clean that. First thing you need to do is unthread your machine. So I always just pull my thread out. Then you're just gonna take your piece of fabric, fold it in half so that you're putting a folded edge into your machine as opposed to the raw edge.
Because we don't want it raveling. We don't wanna be adding extra lint to your machine. But you're just gonna floss out those tension discs or essentially dust those tension discs. Just very easy, get on both sides of them. One side there, one side there, and just run your fabric through there.
And it's just going to dust them out or clean them out a little bit. That's really the only area that I need to clean up on the top. Of course, if there's dust sitting on top your machine, dust off the top because any dust that's sitting here has the potential to go down into little cracks or crevices of your machine. So use your same little duster rag and just wipe it off. Just simple little things like that.
Now we need to talk about down here. Because this is an area where I think people don't like to clean, or they shy away from cleaning because they're afraid to take apart their machine. I'm gonna take off two things. That's all I'm really doing, is taking off the cover so I can see underneath. This is something that you should not be afraid of doing.
You can do this. It's not going to hurt your machine and do it every now and then to dust it. If you do this on a regular basis, hopefully, you won't have to ever take your machine in for a big, deep clean. So I have already unthreaded my machine. So I don't have to worry about a thread getting in the way.
I do wanna go ahead and remove my presser foot. Just gonna get in the way if I leave it on. Open up your bobbin cover. So this is something you should all be very familiar doing, 'cause this is how you have to change a bobbin anyway. And go ahead and take out your bobbin.
If you see any dust or anything immediately in your bobbin case, go ahead and take your fun little makeup brush and just get in here and dust it out. With these stiff bristles on this brush, if you have dust or fiber buildup from fabric that you have sewn, it's gonna stick to this brush and you can just get in there. It'll stick to the brush. You can take it out and you can clean the brush a little bit. That's the basic cleaning.
The next thing you wanna take off is your throat plate. And it's something you absolutely can take off of your machine. Some machines even come with additional throat plates that maybe have other markings and people change out their throat plates all the time. Usually your machine, again back to that little baggie of accessories, probably came with a little screwdriver that can help you pick this up and lift it up. If you can do it with just your fingers, that's great.
I usually have long fingernails and I don't wanna break my fingernails. So I always just use my little snips and all I'm gonna do is use my snip to just lift up that corner so I can grab it. So I just used my snip to get under there rather than using my fingernail, but use whichever works best for you. Go ahead and lift it up and take it off. And now it's gonna expose some of the inner workings of your machine that I think a lot of people shy away from looking at or getting into.
And here's where you want to dust it or clean it out. Obviously, our machine is pretty clean. We do clean it on a regular basis here. So there isn't a whole lot of dust in it, but this is where you would see lint or dust or things building up from your thread, from your fabric. And you just wanna take either brush.
So you can take this one here and brush things away, or you can get in here with your pipe cleaner looking brush and actually come down underneath pieces and get in there and get any pieces of lint or dust out of there that you might see. Use a brush and try and get it out and then clean it off as opposed to blowing on it, going and trying to blow things away, or using compressed air. 'Cause that's just gonna push that even further down into your machine. Now, if you're looking at your bobbin case here, and you see some thread or lint or something directly under your bobbin case. And you can't get to it by going through the tiny little opening, you can go even further and just lift out the bobbin case.
Like so, they just sit right in there, and then you can come in and clean it even more. So make sure, oopsy we have a little red piece of something there. So you just clean that out. So whatever's in your machine, go ahead and clean it out. That's all you really need to do.
So if this seems really intimidating or scary to you, I hope you practice it a couple of times. But do this, make sure your machine is clean and it's going to extend the life of your machine, make it run better, make it run smoother. The first time I cleaned my machine, it actually was a lot quieter the next time I used it. And so that's something that you'll find too. So now I'm gonna put everything back together.
I went ahead and put my bobbin case back in. This is the top cover here of your bobbin case. It just sits in there. Everything fits together like a little puzzle piece. Put that right back in.
Put your bobbin back in if you want to or we can just leave that out for now. Go ahead and put your throat plate back in. So one thing that I do probably every other time that I'm trying to put it back in, is I accidentally get it backwards. And then I'm wondering why it's not gonna fit. So all of these little tiny openings or grooves here, these are for your feed dogs.
So this needs to go towards the back. And with this machine and I think it's the same for a lot of machines too, the back needs to go in first. So there are a little... Let me bring it out so you can see, there's little tiny ledges or they stick out away from your throat plate. They need to go in and under first, you come in at an angle, drop those in and then just push down.
It should click in place. Like so, then you can put your bobbin cover back on. Go ahead and put your presser foot back on. Go ahead and put a bobbin in. You can thread your machine and now you're good to go.
You can do your next projects and know that your machine is clean and ready to go. So just a couple little preventative maintenance tips that I definitely recommend doing. Flossing out those tension discs and then not being afraid to get in there and clean the inner workings of your machine. Try it out. I think your machine is going to thank you for it.

I have a pfaff 1471. How do I remove the bobbin casing?
I've always had machines that had screws holding down the plate. I don't know why but the screwdrivers that came with the machines don't fit in the slots on the screws. The slots are too wide. I found out that using a dime or penny works better. BTW, my machine is a 20 year old Brother.
Thank you for the cleaning the sewing machine demonstration. It was very helpful!
Thank you for the cleaning review. When I clean my machine and remove the bobbin casings, I always push the soft (short) brush down into the machine through the oval hole on the side of the part that encases the bobbin casing. I find lots of dust etc is trapped down there even though I am very good about regular cleaning. Am I running a risk of hurting some part of the machine when I do this (I have an Viking Epic 95q)? Any thoughts?
You forgot to mention oiling.