Basting a Quilt
Peg Spradlin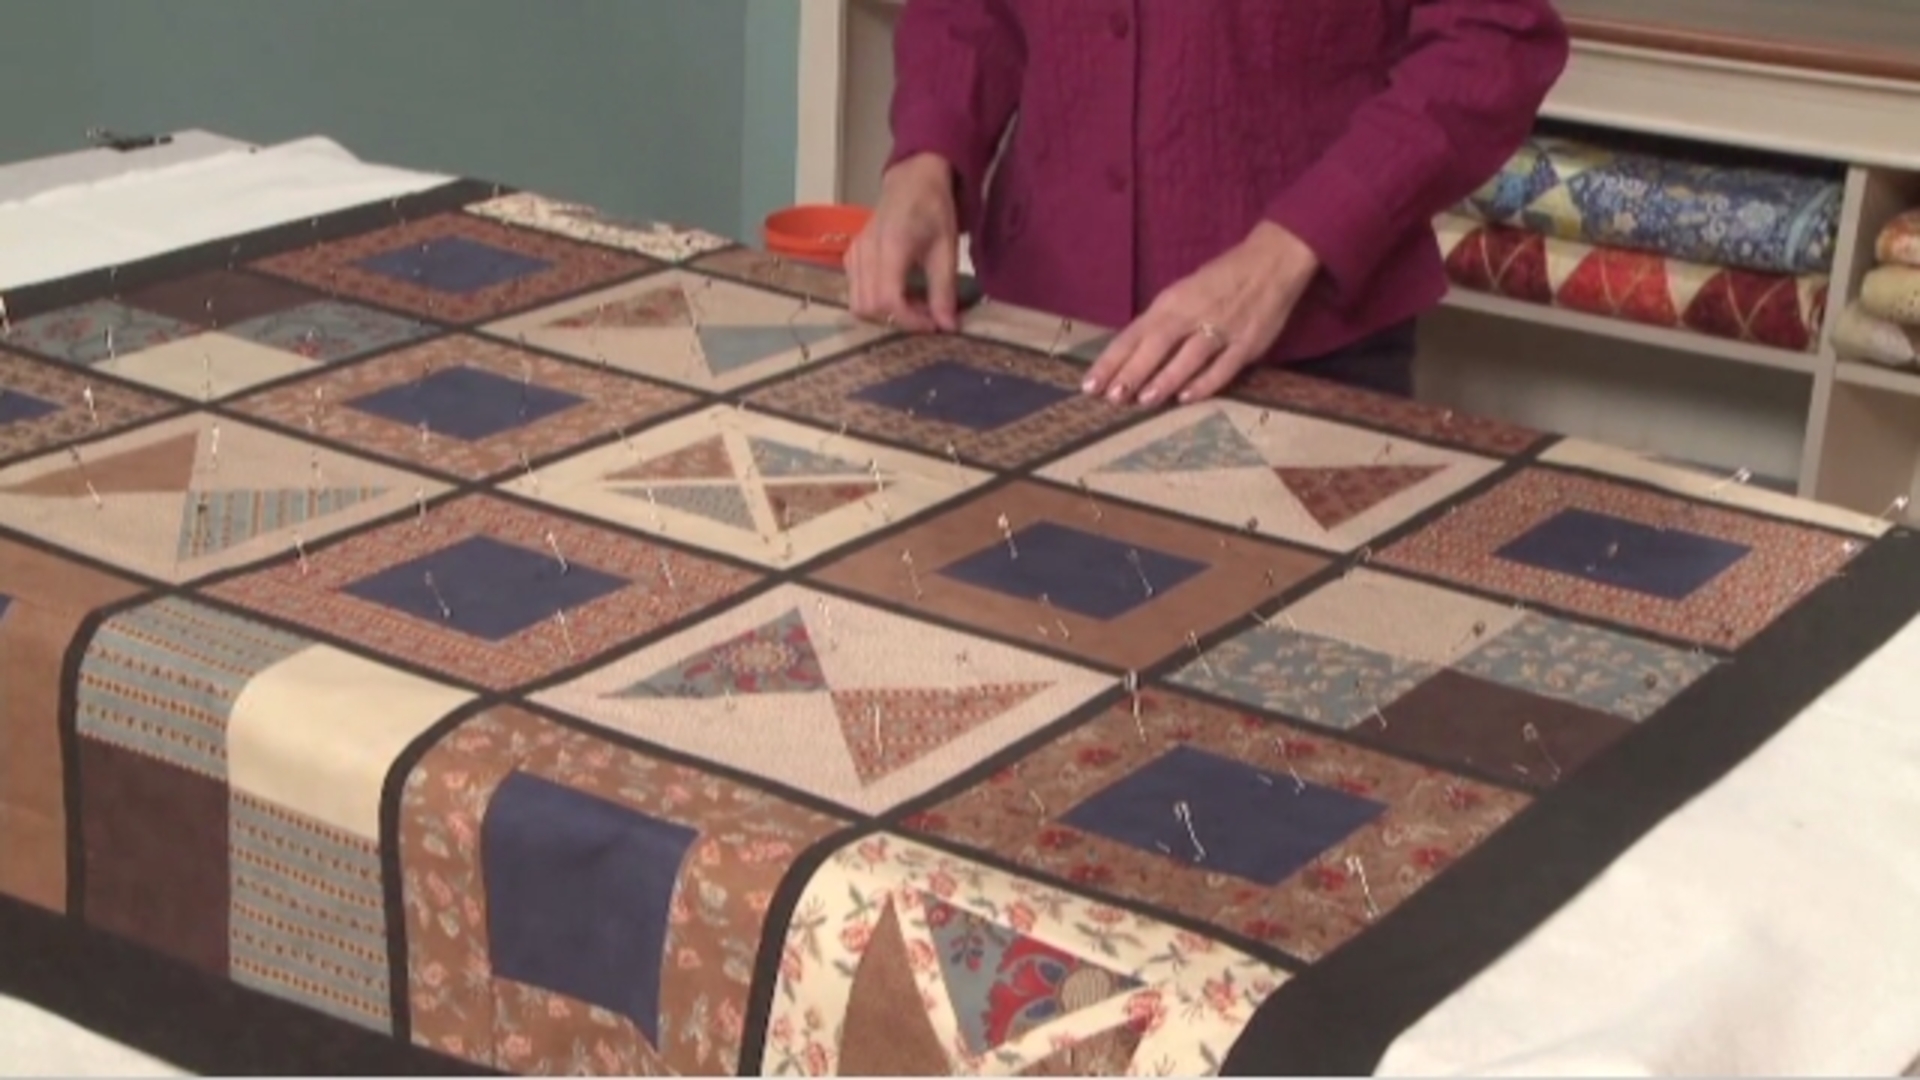
Video Player is loading.
Peg Spradlin teaches you how to baste a quilt to get it ready for machine quilting. She begins by finding the center of your table and then folds your fabric in order to find the center of your quilt fabric.
Basting A Quilt
Check out this additional video for more great instruction on how to baste a quilt.
Watch as Peg continues the process of basting a quilt by pinning the center of the backing and then taping the backing fabric to the table. She continues using large binder clips to secure the fabric to the table at the table edges. When basting a quilt it is important to remove all the wrinkles from the edges of the fabric backing. She explains that the fabric should be tight.
The same process is used for folding and finding the center of your batting material.
Then lay out the top fabric and smooth with the grain when positioning the quilt before basting a quilt. Peg explains that curved safety pins make for excellent results when securing the three layers of a quilt.
Basting your quilt is one of the most important steps in machine quilting your quilt. You need to have an area and a table large enough to handle your quilt top. And then you wanna find the center of your table. I've already marked it here with the tape. Take your tape measure and measure the length of your table.
And then go ahead and divide that in two and mark that position right there with some masking tape or blue painter's tape, whatever you have. And then come and find the center of the width of your table. And again, make a little mark and where these two pieces come together that is the center of your table. So we're ready to position the backing. You wanna make sure that your backing is well ironed.
You don't want any wrinkles or anything in it. I've already folded it but you wanna fold it wrong sides together. First wise, then crosswise like this. And then you'll have that little folded corner and that little folded corner is what meets right here. And the reason that you folded it wrong sides together is so that when you unfold your backing or you're lining, the right side is facing down onto the table.
It can be a little awkward sometimes if you have someone kids or a husband who's willing to help you, that's great. But you can still do it on your own if you have to. Now while you can still see where the middle of your table is go ahead and take a little pin and pin there, because we're gonna be using that center all the way through. Now we're ready to clip the backing. I use binder clips that you can get at any office supply store to based my backing or to clip my backing to the table.
So you just wanna smooth just slightly, pull just slightly with the backing fabric on the edge of the table. And then smooth just a little bit off to the side. You have to make sure that your backing fabric is wide enough and long enough to fold under the lip of the table. Then you come over onto this side and again smooth just slightly. And then this is the last one you clip right here.
I like to do my hands first so now I'm gonna go to the other end of the table and do that side. I've clipped the three sides of the backing and now I'm ready to do the last side which is the most important side in this process. And be sure you have plenty of binder clips, they aren't that expensive you just wanna make sure that that backing isn't going to shift. So now you pull so that there's a nice even tension and all the little wrinkles are pulled out of your quilt backing. And come along the edge, until you get to the end down here.
Kind of make sure that all the wrinkles are out of that edge there. And then you come over and do the other side. Pulling and smoothing. So your backing should be tight enough that when you run your hand over it, you aren't pulling any of the backing up off the table. It should kind of feel and look like a drum.
Now we're ready to put the batting on. Again, you fold it first lengthwise and then crosswise and then you position that little folded corner up into the center of your backing. Remove the pin. Unfold your batting. When you buy a new batting lots of times it's in a real tight roll so you wanna be sure that you take it out of its packaging and let it set flat for a couple of days.
I marked the center again with my finger until I get a chance to put the pin back in so that you know where the center is. And then smooth that batting out on all sides. Make sure you've smoothed out all of the wrinkles. And then you're ready to put your top down. This time when you fold it, you fold it right sides together so that the wrong side show, and you find that center point.
Line it up again with that pin, be sure and remove the pin. Unfold the top. Smooth all the wrinkles out of it and you wanna smooth with the grain. You don't wanna smooth bias if you smooth on the bias you might be stretching your quilt top. I'll go ahead and smooth it until it's nice and flat.
This is also a chance for you to step back and look at your quilt top and see if you've made any mistakes in the piecing. There's been a couple of times where some of the blocks actually had they were misplaced, the patches were misplaced. And that gave me one last chance to take them out and resow them before I my machine quilting. So now we're ready to pin the quilt. I use curved safety pins.
And I use two different sizes. This is a size number one and it's one inch long. This is a size number two and it's one and a half inches long. Either one will work fine for the process that you're doing. Both of them are large enough or long enough that they'll go through all three layers of your quilt top.
And yet they are not so big that they'll poke holes into your quilt top. So I start pinning in the middle. And I don't close, I don't clip the pins until I've done pinning the whole area of the top that is laying flat on your table top. I go ahead and pan just about every three inches. And if you don't wanna measure another good guide is to lay your hand down and the pins should be on each corner of your palm.
So then we'll go ahead and keep pinning this quadrant. And I go ahead and smooth as I go. After I finished pinning this quadrant, then I'll go ahead and move over to the other three areas of the quilt and make sure that I have the full top of the quilt pinned, before I go ahead and close the pits. Now you can see we have the whole top pinned. The top that's laying flat on top of the table and so now we're ready to close them.
I used to close them just using my fingernail and it was just too hard on my fingernails. So what I found was this little thimble that has a little plastic ridge on it, that takes the place of my fingernail. And that's what I use to do my closing. Some people use a spoon, they also sell a tool that's designed specifically for closing your safety pins. And some safety pins come with a little plastic backing on them that makes them easier to close.
And one word of advice, as you're going through the machine quilting process and you take the pins out don't close them, don't re-close them because then when you go to put them back into your quilt top when you're doing the basting, you're just gonna have to take the time to open them up again. So you'll save yourself a lot of time if you don't bother closing them after you take them out when you're machine quilting. The reason that I wait until and clip the pins after they're all in the top is that it minimizes the shifting of the three layers of your quilt sandwich. Now you'll see that, part of the your quilt has not been pinned on both sides there. So we're going to have to unclip the quilt and reposition.
So we'll do that and then you'll either push or pull your quilt tops so that you get the area that has not been pinned onto the top of your table top. As you see I have repositioned the quilt on top of the table, so that the area that hasn't been pinned is now laying on the flat area of the tabletop. I've gone ahead and clipped the pinned side of the quilt sandwich first. And then I came down here and clipped the pinned area on either end. Now we're ready to come and you fold back the top first, then you fold back the batting.
And you wanna make sure you have enough of your backing here that it still folds over in this lip, so that you have something to clip. And go ahead and clip the rest of your backing just like we did in the earlier in the video.. Then go ahead and pull your batting back down and smooth it out. Pull your top down and smooth it out. And then go ahead and pin then in this area that has not been pinned.
Make sure again that you don't close those pins until after they are all in this area. And then once you have those all in and closed, you will need to go ahead and reposition your quilt top for the other side. Do all of the same style steps in the same way. Once you have it all pinned and you're ready to unclip it, go ahead and unclip it and at that point, I go ahead and trim the backing and the batting to about four inches away from the edge of the quilt top. That minimizes a lot of the bulk in your machine as you're doing the machine quilting.
So just remember, take your time this is a very important step in your machine quilting process. Enjoy it, don't rush it and just take your time.

Great instructions.. One question, why don't you close the pins as you go?
I would like to know the name of the quilt pattern, too . . . where can I find it?
I love the thimble you are using! Can you tell me the name of it, or where it can be purchased? Thanks!
Brilliant instructions,I struggle on hands and knees on the floor so this will be much easier. I have a large table but the quilt is wider than my table. Would I still secure the sides in the same way?
Thank you! Binder clips! That's so much better than painter's tape - great idea & so helpful for you to step us through each of the steps. I will be using this method here on out, so thank you, thank you!
Wonderfully clear and concise demonstration, thank you! Takes all of the mystery and uncertainty out of the process. I have a perfect folding table about that size with height adjustable legs and a plastic surface, it will make the job simple.
Great video, I will try this method for sure. Could you please tell me the name of the pattern of the quilt you used in this tutorial? I really like the pattern. Thanks, Carol
What are the dimensions of the table you are using? This looks like it will be the perfect way for me to baste quilts in my small space. I tried basting on a wall and it took forever and did not work very well. This looks like it will work great. So glad I came across this video.
great video Love this. thank you.
Do you not scratch the table too with this method?