TL
How to Attach Quilt Borders
Toby Lischko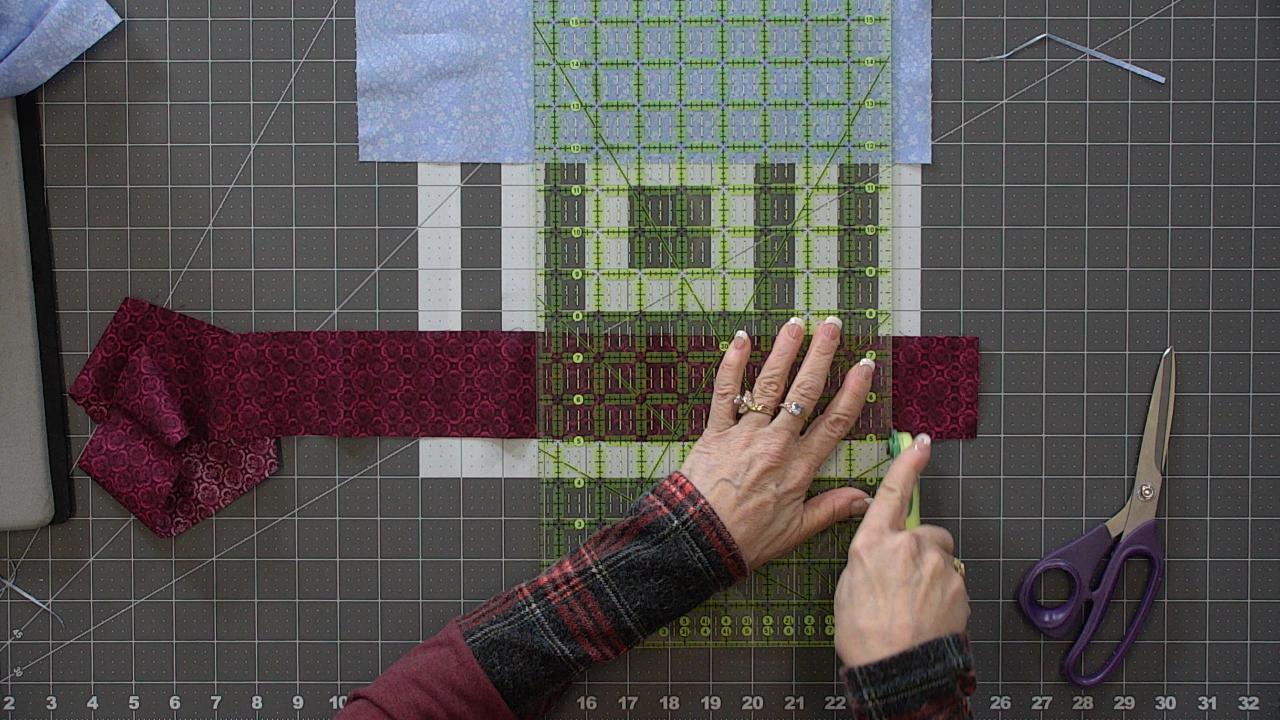
Video Player is loading.
Depending on the quilt design, adding a border is a common last step when completing a quilt top. Toby Lischko shows you how to properly attach quilt borders, including giving tips on squaring quilts and cutting border strips so everything fits together nicely.
Adding Quilt Borders
Before you can add a border to a quilt, it is important to know whether or not your quilt top is square. While accurate piecing and diligent pressing during the construction of the quilt top will help ensure a square quilt, Toby explains why it is always important to confirm that it is square and make any necessary trims or adjustments as needed- no matter what size of quilt top you are making. She shares and demonstrates her preferred technique for squaring a quilt, and while demonstrating on a small sample that fits on the table top, she explains how the same method can be used on a larger quilt.
Once the quilt is square, Toby explains how to attach the borders. She shares which borders she likes to sew on first and why and then demonstrates the method she uses to prepare her borders. If following a quilt pattern, it will generally tell you what size to cut the side as well as top and bottom borders. While these measurements will generally work when assembling a quilt, it is always important to measure your quilt top and make adjustments to the border length if needed, before attaching it to the quilt. This will help ensure that the borders lay flat once they are sewn in place and there is no waviness to the border.
Toby shows how she likes to align and pin the borders onto the quilt top before stitching in place. Ensuring a square quilt top and following these guidelines for creating great quilt borders should help all of your future quilts and border turn out as desired.
One issue I have found with beginner quilters and even some more advanced quilters is how to get their borders on, how to square up their quilt, and how to get their quilt to lay flat and their borders to lay flat. So what I'm going to show you today is I'm gonna show you how I get my quilt to lay flat, how to measure for your borders, and how to pin your borders on so that everything lays nice and flat and you have a nice square quilt. Okay? So here I have a piece of fabric. I'm gonna pretend this is my quilt top, and in order to square it up before I put my borders on.
Because if you don't have a square border in the beginning, you're not gonna have a square quilt when you finish. So I'm gonna find the center of my quilt by just folding it in half. Giving it a couple little creases. And then I'm gonna fold my ends to the center of the quilt, just like this. And you can see I've purposely made these a little bigger.
It doesn't quite match on each side. It's wider. And that's usually what happens with quilts. And so I have to make the outside of the quilt, the outside edges of the quilt, equal the center of the quilt in order to get it to lay flat. So I'm gonna re cut some of my edges so that the edges are the same as the center of the quilt.
And sometimes I'll take my ruler and I'll lay it across and square it up towards the center. Of course, the quilt is gonna be bigger. So you're gonna have to start at the top or start at the bottom. And now I'm gonna do the same thing to the top. I'm gonna make it equal to the center of the quilt and I'm gonna turn it around and do the same thing on the other side to make it square.
So again, I'm gonna measure from the center and cut a little bit on each side and now I'm gonna try and I'm gonna look and see now if it's the same in the center, as it is on the outside. Now, if it's off just a little bit, I'm not gonna worry about it. But if it's off like a quarter of an inch on each side, that's a lot of fabric to have to put together when you're putting your borders on. So I'm gonna do it in both directions. 'Cause I have to figure out, is it square going in both directions?
So I'm gonna fold it in half again, going the other way. I'm gonna fold my edges to my center like this. And then I'm gonna check to see if it's square going that way. Now this one is a little bit short on each side, but it's not so much that I can't ease something in when I'm doing my borders. Okay.
So I'm not gonna worry about squaring that up. I do wanna make sure that my corners are square. And what I do is I take my ruler and I put it up on the corner and it should be a 90-degree angle on all sides of my quilt. So I would check that with all four corners of my quilt to make sure that the corners are square. Okay.
So I'm gonna check all four corners to make sure they're square. If they're not, I'm gonna trim a little bit off if I have to. And then I'm gonna check this other corner to make sure it's square and it's lined up along the edges. So that one's okay too. So now I'm gonna get ready to put my border on.
Now, when I first started quilting, I measured my border and if it was a big quilt, I'd have to use math, okay? So you have to, if it's really big, sometimes you have to take your strip, fold it in half, and fold it into half again. So you have quarters. So then you have to take your quilt measurement and divide it by four and all that kinda stuff. But I found a really fast method for putting my borders on.
So I'm getting ready to sew my borders on. I usually sew the long side on first. So what I do is I lay my quilt either on the floor or I have a quilting machine. So I lay it across the bar on my quilting machine and I take my strip. So I've cut my border strip.
And I lay it across the center of the quilt. Remember we took everything and we put it towards the center of the quilt because that's the measurement I'm gonna use. So I lay my border strip across the center of my quilt and then I just take a pair of scissors and I make a little clip right next to the quilt on both sides. Okay. And then I can take my strip and put it on my cutting surface and then take my ruler and wherever the clip is, I'm gonna line it up along the line of my ruler.
'Cause I wanna have a square end and I'll clip it. I'll cut it with my rotary cutter. I'll do the same thing with the other side. Find my little clip. Oh, there it is.
Okay. So I take it and then I'm going to square that end up also. Align the edge of the border with my ruler. Okay. And then I'm gonna cut that edge now.
So now I've got a border that's gonna match my quilt. So now the important thing is is you wanna pin. Pin, pin, pin, pin. If you just lay this on here and you've got a really long border, if you just sew it, that border will stretch and it won't lay. It won't end up where it's supposed to be.
So it's really important to pin your borders. So what I'm gonna do is I'm going to fold my border in half and I'm gonna find out where the mid section of my quilt is and I'm gonna fold that in half. And then I'm going to match my border strip to my quilt where it matches in the middle. And then I'm gonna put a pin in the center and match that. And then I'm gonna pin the edges.
Now this is where, if you have to, sometimes it's still not perfect. You can ease your fabric in, your borders in, when you're sewing. So to do that, you're gonna put a lotta pins in. Okay. So I'm gonna pin each end.
And then what I do is I find the center. Okay. So I'm gonna find the center between these two pins. I'm gonna put a pin there. Same thing on the other side, find the center.
And I just keep doing this. Now because this is a small sample, and you're using a bigger quilt. I would just keep finding the center and then I would just keep putting pins in. So what I end up usually is my pins are about four inches apart. And then I know I've got my borders on really nice and flat.
Okay. So then I would go ahead and sew my border on with a quarter of an inch. Press it. Do the same thing with the other side. And when I'm done, I'm gonna do this exact same thing.
I'm gonna lay my border strip across the center after I've sewn on my two side borders and then I'm going to pin them and then sew them on. And since your quilt center is flat is square. Then when you put your borders on, those will be square too. And so this is a really important part of putting your quilt together. And it's the best way I found to make your quilt lay nice and flat.

Very helpful. Now i would love a follow up to see how she handles the corners. I have only done miters where the binding is a strip that goes around the corner. Thanks!
I wish she would have shown an actual large quilt after showing the sample. I think it would’ve been very helpful. But she did offer some good advice.
After attaching top and bottom, does adding the sides create overlapping corners? Is that going to cause bulk when adding binding? or do you cut the side fabric to just fill in the empty space?
This doesn't discuss how to join the border fabric. Most quilts are larger than the fabric width.
The title isn’t reflective of the video at all. This is only part of the process of attaching borders.
The quilt I need to put borders on is not square. The four corners are at an angle. How would I do that?